Ansible: Automating server installation
Guillaume Briday
9 minutes

This article is the first part of a step-by-step deployment guide for a project using multiple technologies. Here, I will deploy my laravel-blog project. It is built with PHP and Laravel, but the process will be quite similar for other languages or frameworks, at least for this part.
Overview
The project’s development environment is set up with Docker, and we’ll use the same technology for staging and production deployment. This approach simplifies the server-side setup as everything is containerized.
If these concepts are still unclear, I wrote an article about Docker to help you better understand them.
For server setup, we’ll proceed in two steps:
- Configure the server tools with Ansible.
- Automate project deployment with Capistrano and Docker-compose.
These tools have distinct roles but collectively enable us to automate and streamline the deployment and server setup processes, a practice known as industrialization.
Introduction to Ansible
Ansible is a command-line tool designed to automate system configuration and software deployment. You can find more details in the official documentation, but I’ll summarize it here.
Ansible is installed on your machine, not the server. Once set up, it connects to the server via SSH and executes commands specified in .yml files, known as “playbooks.”
This approach has two advantages:
- No need to run commands manually on a clean server.
- Playbooks are standard files, making them version-controllable.
Additionally, we can use a hosts file to list available servers and define server-specific variables. This file shouldn’t be shared since it might contain private data.
To enhance readability and configuration customization, commands can be separated into roles.
Let’s explore hosts, playbooks, roles, and templates in detail.
The hosts file
The hosts file defines the servers Ansible will use. It is formatted as follows and doesn’t require a specific extension:
[webservers]
example.com
192.168.50.4
foo.example.com

[databases]
foobar.example.com
barfoo.example.com

# Ubuntu Xenial or later
[webservers:vars]
ansible_python_interpreter=/usr/bin/python3
If you’re using Ubuntu Xenial or later, add variables to groups like webservers. For example, the variable ansible_python_interpreter with the value /usr/bin/python3 ensures Ansible uses Python 3, which is the default for these Ubuntu versions.
The file name doesn’t matter; it will be specified during provisioning. By convention, it’s often named hosts.
You can define groups containing server addresses. For instance, a server with the address example.com is part of the webservers group. Groups allow commands in playbooks to run across multiple servers, which is very practical. A group can include one or more servers.
There’s a default group: all, which includes all servers in the playbook.
Playbooks
Playbooks are Ansible’s core component. They define the configuration and commands to execute on the server. You can also include specific information and conditions. Ansible abstracts many parameters, improving file readability.
The documentation is available here.
To create a playbook, make a playbook.yml file. For example, to install Vim:
---
- name: Provisioning webservers group
  hosts: webservers
  become: yes
  tasks:
    - name: Installing Vim
      apt:
        name: vim
        state: latest
        update_cache: yes
The hosts: webservers line references the servers listed in the webservers group in the hosts file.
Commands starting with - name: provide terminal feedback during provisioning.
You can define multiple tasks. In this example, installing Vim is equivalent to running:
$ apt install vimProvision the server using:
$ ansible-playbook -i hosts playbook.ymlThe -i flag specifies the hosts file path. Replace hosts with your file name.
Ansible outputs something like:
PLAY [Provisioning web group] ************************************************************************************************

TASK [Gathering Facts] *******************************************************************************************************
ok: [example.com]

TASK [Installing Vim] ********************************************************************************************************
ok: [example.com]

PLAY RECAP ******************************************************************************************************************
example.com               : ok=2    changed=0    unreachable=0    failed=0
Ansible summarizes the changes. In this example, two tasks completed successfully.
Handlers
Handlers are tasks triggered by changes. They are defined in a handlers section and invoked with notify.
For instance, to use nginx, call the restart nginx handler after completing a task:
---
- name: Provisioning webservers group
  hosts: webservers
  become: yes
  tasks:
    - name: ensure nginx is at the latest version
      apt:
        name: nginx
        state: latest
        update_cache: yes
      notify:
        - restart nginx

  handlers:
    - name: restart nginx
      service:
        name: nginx
        state: restarted
Here, Ansible executes the equivalent of:
$ service nginx restartRoles
Files can quickly become large and difficult to read. To manage this, commands can be separated into subfolders and referenced in a standard playbook.
Tasks or services can be grouped into roles, which is very convenient. For instance, if you reuse a playbook for another server, you only need to uncomment the line calling the role instead of executing an entire part of the installation.
To call roles, define them in your playbook.yml as follows:
---
- name: Provisioning webservers group
  hosts: webservers
  become: yes
  roles:
    - tools
    - docker
    - app
Your project structure should look like this:
├── hosts
├── playbook.yml
└── roles/
    ├── docker/
    │   ├── tasks/main.yml
    │   └── handlers/main.yml
    ├── tools
    │   └── tasks/main.yml
    └── app
        ├── tasks/main.yml
        ├── templates/.env.j2
        └── templates/docker-compose.j2
The folder names are significant. For instance, if you have a main.yml file in a role’s handlers folder, you don’t need to specify explicitly that it’s a handler.
I’ve added a tools role to include practical utilities for server maintenance, such as Vim, Git, and htop.
We’ll explore the app role and its templates in detail later.
Installing Docker and tools
Let’s move to the most relevant part: installing Docker for deployment with Capistrano.
I followed the official documentation for Docker installation.
For tools, the process is straightforward. I created a list of tools necessary for managing the server and for Docker installation. Instead of creating a task per service, I used Ansible loops.
# roles/tools/tasks/main.yml
---
- name: Install some tools
  apt:
    pkg: "{{ item }}"
    state: present
    update_cache: yes
  with_items:
    - htop
    - vim
    - git
    - curl
    - python3-pip
The update_cache: yes parameter ensures that the repository cache is updated before running the command, providing the latest package lists.
For tools, no handlers are needed, so I didn’t create additional folders.
For Docker, the approach is similar, with tasks for each element to install:
# roles/docker/tasks/main.yml
---
- name: Install packages to allow apt to use a repository over HTTPS
  apt:
    pkg: "{{ item }}"
    state: present
  with_items:
    - apt-transport-https
    - ca-certificates
    - software-properties-common

- name: Add GPG key for Docker
  shell: curl -fsSL https://download.docker.com/linux/ubuntu/gpg | sudo apt-key add -

- name: Add the Docker repository to the apt sources list
  apt_repository:
    repo: "deb [arch=amd64] https://download.docker.com/linux/ubuntu xenial stable"

- name: Install Docker
  apt:
    name: docker-ce
    state: present
    update_cache: yes
  notify:
    - start docker

- name: Install Docker-compose
  apt:
    name: docker-compose
    state: present

- name: Add ubuntu to the docker group
  user:
    name: ubuntu
    group: docker

- name: Add the Python client for Docker
  pip:
    name: docker-py

- name: Pull docker images
  docker_image:
    name: "{{ item }}"
  with_items:
    - nginx:latest
    - php:7.1-fpm
    - mysql:latest
    - node:latest
As seen at the end of the file, I pre-download necessary images to save time during deployment.
Handlers for Docker look like this:
# roles/docker/handlers/main.yml
---
- name: start docker
  service:
    name: docker
    state: started
    enabled: true
Templates
In many scenarios, we want to hide sensitive information like database passwords or API keys.
These are often stored in configuration files or environment variables. To version control our code without exposing secrets, we use templates.
By default, Ansible uses jinja2 for template generation.
Templates are created with a .j2 extension and converted by Ansible during provisioning. For instance, we define .env and docker-compose.yml with placeholders for sensitive data stored in the hosts file.
[webservers]
example.com
192.168.50.4
foo.example.com

[databases]
foobar.example.com
barfoo.example.com

# Ubuntu Xenial or higher
[webservers:vars]
ansible_python_interpreter=/usr/bin/python3

# Template variables
db_password=my-secret-password
...
To handle application-specific tasks and templates, I created an app role and added a templates folder for .j2 files.
Here’s the tasks file for the app role:
# roles/app/tasks/main.yml
---
- name: Ensures App dirs exist
  file:
    path: "{{ item }}"
    state: directory
    owner: ubuntu
    group: docker
  with_items:
    - /var/www
    - /var/www/logs
    - /var/www/vendor
    - /var/www/uploads
    - /var/www/node_modules
    - /var/lib/mysql

- name: Adding .env file
  template:
    src: ../templates/.env.j2
    dest: /var/www/.env
    owner: ubuntu
    group: docker

- name: Adding docker-compose.yml file
  template:
    src: ../templates/docker-compose.yml.j2
    dest: /var/www/docker-compose.yml
    owner: ubuntu
    group: docker
Variables in templates are referenced as follows:
# roles/app/templates/.env.j2
---
DB_PASSWORD={{ db_password }}
On the server, this will be rendered as:
# /var/www/.env
---
DB_PASSWORD=my-secret-password
Provisioning
Run the playbook.yml with the following command:
$ ansible-playbook -i hosts playbook.yml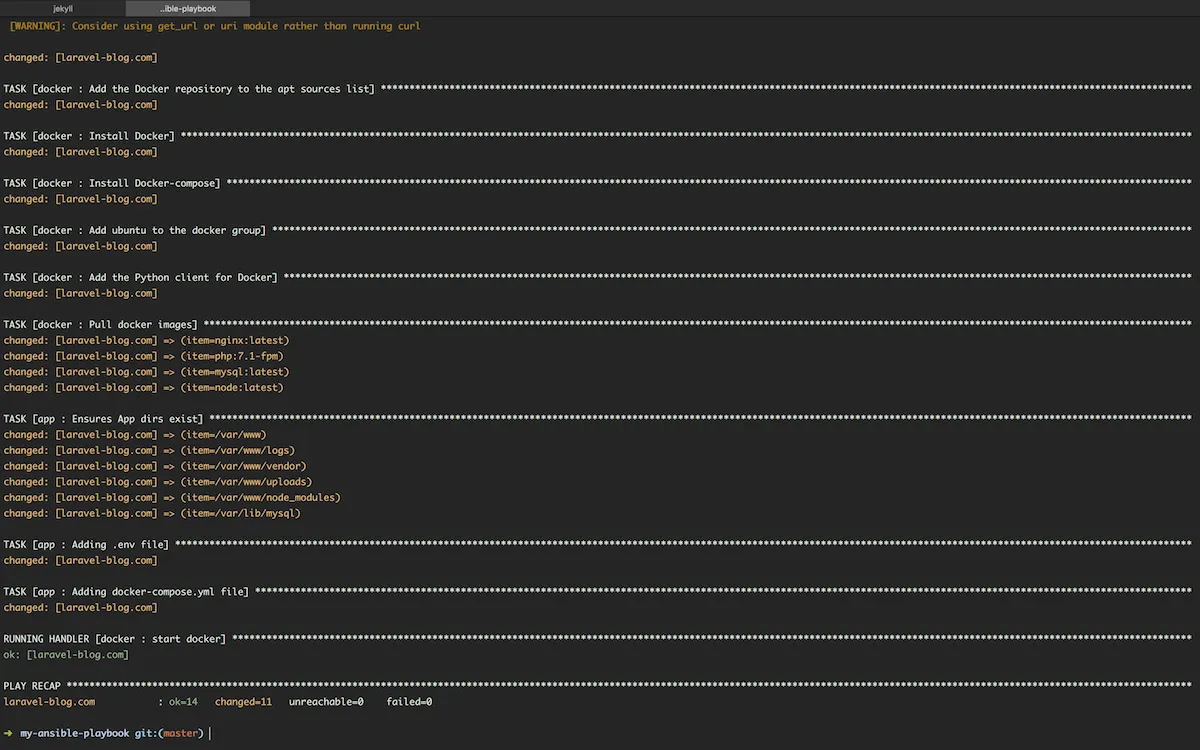
Verify everything works by connecting to the server:
$ ssh example.com
$ service docker status # Check Docker is running
$ docker-compose -v # Verify docker-compose installation
$ htop # Check if htop is installed
$ vim -v # Verify vim installation
Everything looks good! Next, we’ll proceed to automated deployment with Capistrano.
How to Test? (Optional)
If you don’t have a server available, you can practice using a virtual machine. For this, we’ll use Vagrant. This isn’t a tutorial on Vagrant, so I won’t go into its details here, but here’s the configuration you can use.
In a new folder, create a Vagrantfile:
# -*- mode: ruby -*-
# vi: set ft=ruby :

Vagrant.configure('2') do |config|
  config.vm.box = "ubuntu/xenial64"
  config.vm.network 'private_network', ip: '192.168.50.4'

  config.vm.provider "virtualbox" do |v|
    v.memory = 1024
    v.cpus = 2
  end
end
Then run the following command:
$ vagrant upI deliberately omitted the section on Ansible provisioning because the idea is to simulate a remote server with SSH access. Once the server is available, we’ll use Ansible commands to provision it.
Vagrant is used only to launch the simulation virtual machine. For more “realism,” you can replace the parameter Host 192.168.50.4 with Host example.com in your SSH configuration and add the following line to the end of your /etc/hosts file:
192.168.50.4 example.comYour hosts file, used by Ansible, can then contain this domain name instead of the virtual machine’s IP address.
Of course, you can replace example.com with the actual address of your server.
Note that Docker must be executed as root. Therefore, you need to prefix each command with sudo or start the session with sudo su.
To ensure everything works, you need to configure SSH access to your virtual machine as explained in my previous article on this topic.
Conclusion
There’s certainly room for further improvements, such as adding more tools, leveraging templates, or implementing multi-server deployments.
I’ll continue to evolve this project over time, but with what we’ve done here, we’re already prepared for production deployment.
The full project is available on my GitHub repository: traefik-docker-ansible.
Please note that the content may have changed between the writing of this article and when you read it.
In the next article, we’ll cover automating deployment with Capistrano on our now-ready server.
If you have suggestions or questions, feel free to leave them in the comments!
Thank you.
EDIT as of 04/04/2018’:
I’ve made many changes to the configuration since writing this article.
5380485 is the last relevant commit. An article about the new architecture is in progress.