Understanding and setting up Docker

Guillaume Briday
15 minutes
Recently, I had the opportunity to use Docker in a more advanced way, and I wanted to share my experience because I encountered several stumbling blocks in my learning process that I'd like to detail here more clearly.
We're going to talk about several important things. The goal is to see in detail how Docker works and the general principles that need to be well understood before going further. Later, we'll see how to set it up in a concrete case.
Reminder about virtualization
Before starting, I think it's important to recall what Docker is and why it's distinguished from other virtualization tools.
To take Wikipedia's definition, Docker is a tool for deploying applications within containers. This is known as lightweight virtualization. Simply put, a container can share a large part of its resources with the host system. Thus, it has read-only access to the operating system files to set itself up. The advantage here is undeniable: we use the same resources for one or multiple containers. To take a simple example, if you want to set up a container for MySQL and another for PHP, both will use the same files present on the system without recreating them inside their container, unlike a virtual machine (VM), for example.
On the other hand, a virtual machine will recreate a complete system within the host system to have its own resources; this is known as heavy or full virtualization.
Containers can thus run on the same machine, sharing the same OS while being isolated at the process or user level.
The official diagram summarizes this very well and helps to clearly understand the difference.
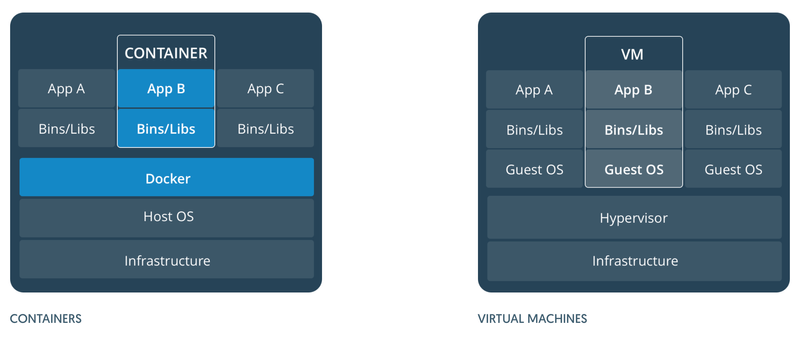
Therefore, Docker has several advantages that have contributed to its success. Containers take up very little space, they are much faster to launch than VMs, and consume much less RAM.
Now that we have a better understanding of the main categories of virtualization, let's dive into the fundamentals of Docker.
Essential components of Docker
Now that we have a better grasp of the general functioning of containers, we'll look in more detail at how to use Docker and what are the essential components for its setup.
This is a very important point I wanted to address because it's often a stumbling block in learning and setting up containers.
Volumes
As we saw earlier, containers are isolated from the host system. They have read-only access to exist, but that's all. The issue is that in many cases, we will need to use files that are not in a container.
They will either need to be shared by multiple containers or need to be saved even after a container is deleted. Indeed, when a container is deleted, all files inside it are also deleted. This can be problematic for these reasons or for uploading a file by a user on a web application, among others.
To address this problem, Docker has implemented a system called Volume.
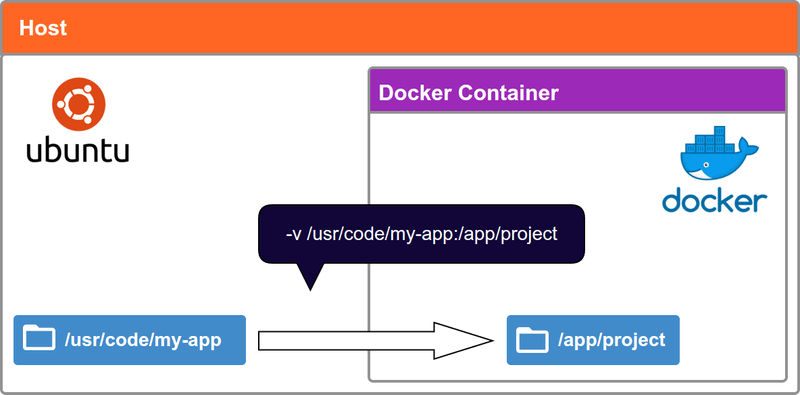
Volumes aim to use data directly on the host system. Simply put, we tell Docker: "This particular folder (or file), don't look for it in the container but at this location on the host. Thanks!". The paths to these folders and files can be set up in the container's configuration, which we'll detail later.
Once the volume is set up, the container has direct access to the targeted folder on the host. It's not a copy from the container to the host but a direct access from the container to the host's file system. So we'll use it to share source code between multiple containers, but also to save a MySQL database, and more. We can, of course, define as many volumes as we wish with paths of our choice; there's no limitation at this level.
Ports
Between the host and the containers
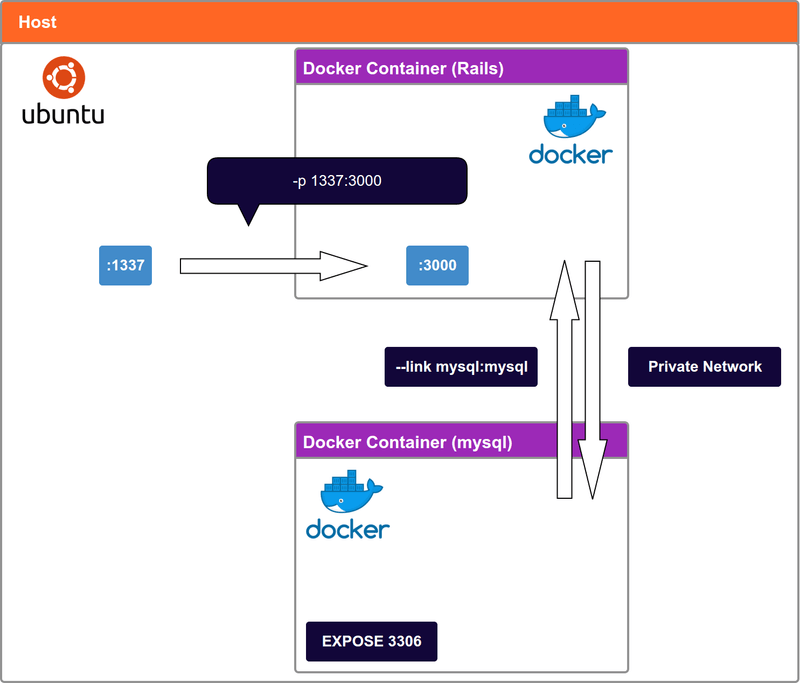
In the same way as the rest, the network ports inside a container are isolated from the rest of the system. This is an important notion because we'll need to do port forwarding. When a service exposes a port inside the container, it is, therefore, not accessible from the outside by default.
We need to expose a port from the host to an internal port in a container. To be clearer, I'll take an example.
The default port of a Rails server is 3000. To access this port from my host, I need to forward the container's internal port 3000 to a port of my choice on the host. There's no restriction at this level.
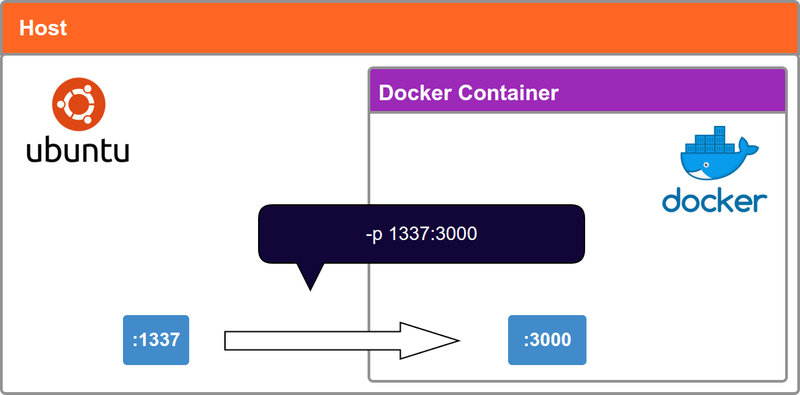
Thus, to connect to our Rails application running in a container on port 3000, we can simply do:
$ curl http://localhost:1337I arbitrarily chose port 1337; feel free to change it according to your needs.
Between containers
There's also another important aspect with ports, which is the concept of EXPOSE.
EXPOSE allows you to open a port only for other containers. In practice, we'll use it to make containers interact with each other. Typically, a MySQL container doesn't need to be accessible via the host, so we'll expose its default port 3306 to other containers so they can access it.
Docker also uses this concept when using the --link operator, which we'll detail.
Links
One of Docker's philosophies is to have one container per service. Containers need to communicate with each other. We took the example of MySQL earlier, but there are many other examples.
The link operator allows, as its name suggests, to link containers together automatically. It allows a container to have direct access to the service of another container via a port on a private network. To define this port, it looks at the value of the EXPOSE on the target container.
Docker will also modify the /etc/hosts file for us. Thus, we can access this container via its name rather than its IP more easily. The advantage is that we won't expose a container on the host for nothing. It's a totally private network between two containers.
Docker images
Now that we have a better grasp of the main principles of Docker, I'm going to discuss a fundamental aspect of Docker, namely images.
Images have largely contributed to Docker's popularity due to their simplicity of setup. An image represents a state of a container at a given moment. Many services, more or less well-known, offer pre-configured images so that you just have to launch them in the blink of an eye. The list is available on the Docker Hub.
Images are defined by a Dockerfile, which we'll discuss in detail later. They all originate from a parent image (except base images like OS images, for example). For instance, for PHP, according to the official image's Dockerfile, it's Debian Jessie that's used to build the image at the time of writing this article.
As I was saying, an image is just a state of a Docker configuration at a moment. We can see this clearly in the PHP Dockerfile; they started from a clean Debian installation to install and configure PHP. On our side, we'll just have to launch this image in a container, and it will be all set. Docker will add configuration layers to the image with each configuration change.
Of course, we can create our own image to share it or use it personally; we'll see how to do this later in the article.
The command to list the Docker images available on your machine:
$ docker imagesDockerfiles
For the following, Docker must be installed on your machine or server. For this part, I refer you to the documentation that will detail the steps to follow according to your operating system: https://docs.docker.com.
It's a file that will describe the construction of your image. It must be located at the root of your project. It will contain several essential instructions and other optional ones that we'll see together.
I suggest setting up my project Laravel-blog on Docker. The need is very standard, and I think it will make a good example for understanding the fundamentals.
We will need:
- PHP 7.1 FPM and some dependencies that Laravel requires
- Configure locales to have dates in French
- A database with MySQL
- Nginx
- Ability to run background jobs
To start, we'll create a Dockerfile. The idea is to build a new image from the PHP-FPM one, so we can use it in containers later.
We're going to modify the php:7.1-fpm image as they did with Debian. You can see this in the official image's Dockerfile.
In the Dockerfile, we must first choose the base image that we will adapt to our needs:
FROM php:7.1-fpmThis can only be defined once in the file.
We can also define a LABEL concerning the maintainer of the Dockerfile to know who to contact if needed:
LABEL maintainer="[email protected]"This is an optional value.
We will install our system dependencies. Docker will create intermediate layers to save the image's state at each command. This avoids redoing everything each time if no values have changed in the meantime.
RUN apt-get update && apt-get install -y \
    build-essential \
    mysql-client \
    libmcrypt-dev \
    locales \
    zip
To make the image a bit lighter, we can clear the dependencies cache (optional):
RUN apt-get clean && rm -rf /var/lib/apt/lists/*Now we install the PHP extensions that Laravel needs for this project:
RUN docker-php-ext-install mcrypt pdo_mysql tokenizerTo have dates available in French in the project, we need to install the locales at the system level:
RUN echo fr_FR.UTF-8 UTF-8 > /etc/locale.gen && locale-genAnd finally, we'll change the WORKDIR to have a folder that will host our application:
WORKDIR /applicationThe WORKDIR is the entry point of our container. It defines the path to use for all commands such as RUN, CMD, ENTRYPOINT, COPY, and ADD.
I'm not using ENTRYPOINT here, but I wanted to mention it briefly. I invite you to consult this article which details the difference between the RUN, CMD, and ENTRYPOINT commands.
And there you go, our Dockerfile is complete for this image, and it should look like this:
# Dockerfile

FROM php:7.1-fpm
LABEL maintainer="[email protected]"

# Installing dependencies
RUN apt-get update && apt-get install -y \
    build-essential \
    mysql-client \
    libmcrypt-dev \
    locales \
    zip

# Clear cache
RUN apt-get clean && rm -rf /var/lib/apt/lists/*

# Installing extensions
RUN docker-php-ext-install mcrypt pdo_mysql

# Setting locales
RUN echo fr_FR.UTF-8 UTF-8 > /etc/locale.gen && locale-gen

# Changing Workdir
WORKDIR /application
Docker needs the image to be built at least once to be able to mount containers on it.
$ docker build -t laravel-blog .The flag -t laravel-blog allows you to define a name for our image, which will be very practical when we mount containers on it. And the dot at the end of the command indicates that we want to use the Dockerfile located at the same level. In our case, it's the one we just created earlier.
Once built, you should see laravel-blog appear in your list of images:
$ docker images | grep laravel-blogSetting up the final project
As I mentioned at the beginning of the article, the idea is to create one container per service.
Unlike a virtual machine, a container cannot be launched if it does nothing. So we can launch a container for a very unitary task and let it "die" once its work is completed.
Thus, the first thing to do in our case is to install PHP dependencies via Composer.
The docker run command that we will use a lot later is composed as follows:
$ docker run [OPTIONS] IMAGE [COMMAND] [ARG...]Installing our dependencies via Composer
I didn't have much interest in installing Composer in my Dockerfile earlier. I would have added complexity to it, and there's an official Composer image precisely for this need.
The documentation tells us exactly what we need to do to install our dependencies via a container:
$ docker run --rm -v $(pwd):/app composer/composer installcomposer/composer is the name of the image, which always goes at the end, before any command to execute, which is our case with the install.
The --rm flag allows us to automatically delete the container once it has finished installing the dependencies. Indeed, a container stops by itself but remains in the exited state as long as it is not relaunched or deleted afterwards. In our case, keeping this container in that state is not relevant.
The command -v $(pwd):/app allows us to mount a VOLUME between the current folder on our host and the /app folder in our container. This will allow us to install the dependencies on our host via a dedicated container. I use the /app folder for this container to mount the volume because it's the default WORKDIR of the Composer image.
Installing a database with MySQL
We can now move on to a critical part of the application, namely saving our data in a database. For that, I simply use the official MySQL image.
The documentation explains everything once again. To define a database or create a user with a password, you need to use environment variables.
We need to save the database on the host to be able to stop and restart the container multiple times without losing information or simply if the container were to stop.
Since we'll need the database from the other containers, I'm going to rename it for simplicity when setting up the --link we talked about earlier in the article. Lastly, it's optional, but I want to access the database from outside the container, so I need to forward the default port used: 3306.
So, let's start by defining the name of the container with the --name mysql flag. I choose to call it mysql, but you can choose any name you want.
For the ports, I choose to forward the same port used by MySQL to the external port; you can choose any free port you like:
-p 3306:3306 # -p <host>:<container>The environment variables must have a name that the MySQL image will use by default; you just need to change their values with the -e flag:
-e MYSQL_ROOT_PASSWORD=secret -e MYSQL_DATABASE=laravel-blogMySQL will take care of creating the database and users, if needed, based on these environment variables completely transparently for us. Fantastic!
And finally, to run the container in the background, we need to use the -d flag.
The command to launch the MySQL container thus looks like this:
$ docker run --name mysql -p 3306:3306 -v $(pwd)/tmp/db:/var/lib/mysql -e MYSQL_ROOT_PASSWORD=secret -e MYSQL_DATABASE=laravel-blog -d mysqlYou must not confuse the two mysql in the command. The first is the name of the container that will be launched, and the last is the name of the official image.
Installing the web server and the queue manager
Now that we've created an image from PHP-FPM, we can use it simply. We just need to give a name to our container; this is almost essential this time for setting up Nginx just after. I remind you that we chose to set the image's WORKDIR to the /application folder, so we'll create a volume with our project in this folder as well so that the PHP server can have the sources.
You can create one or more volumes with the following flag:
$ -v $(pwd):/application # -v <host path>:/<container path>$(pwd) allows us to define the current folder on your host.
Finally, we'll link the MySQL container to access our container via a private network.
There's no need for a command at the end; everything is already managed by the PHP-FPM image.
$ docker run --name blog-server -v $(pwd):/application --link mysql -d laravel-blogFor the queue manager, it's a bit different. Laravel includes a queue manager that needs to be launched via the command line. I'm going to mount a second container with the same image, but this time specifying the command to run:
$ docker run --name queue-server -v $(pwd):/application --link mysql:mysql -d laravel-blog php artisan queue:workSetting up Nginx
Nginx will be our web server that will handle all requests from the outside. It will ask the PHP-FPM server to process the PHP files before sending them back to the client.
To do this, we'll need to create an Nginx configuration so it can work with our application:
# nginx.conf

server {
  listen 80;
  index index.php index.html index.htm;
  root /application/public; # default Laravel's entry point for all requests

  access_log /var/log/nginx/access.log;
  error_log /var/log/nginx/error.log;

  location / {
    # try to serve file directly, fallback to index.php
    try_files $uri /index.php?$args;
  }

  location ~ \.php$ {
    fastcgi_index index.php;
    fastcgi_pass blog-server:9000; # address of a fastCGI server
    fastcgi_param SCRIPT_FILENAME $document_root$fastcgi_script_name;
    fastcgi_param PATH_INFO $fastcgi_path_info;
    include fastcgi_params;
  }
}
This is a fairly standard configuration. First, we start by listening on port 80, which is the default HTTP port; this implies that we'll need to forward external ports to port 80 of the Nginx container.
Then, we specify the root path, which will be the default path for processing requests. We use /application/public, because public is the entry folder used by Laravel. All requests must arrive in the index.php file of this folder and will then be processed by Laravel's internal router.
The last line that interests us is fastcgi_pass blog-server:9000. We notice an important thing: the blog-server.
Indeed, fastcgi_pass expects to receive the link to a fastCGI server (in our case, it's PHP-FPM that manages it) on port 9000 by default. What's great is that we can use the name of the container we set up earlier since Docker has changed the /etc/hosts file to bind blog-server to the corresponding container's IP address via the private network. It's so convenient!
All that's left is to mount a volume to access assets, among other things, from the outside and replace the default.conf configuration used by Nginx by default:
$ docker run --name nginx --link blog-server -v $(pwd)/nginx.conf:/etc/nginx/conf.d/default.conf -v $(pwd):/application -p 80:80 -d nginxCompiling assets
Nothing simpler here; I use the official Node image in its version 7 because I have inexplicable errors with version 8:
$ docker run --rm -it -v $(pwd):/application -w /application node:7 npm install # Install npm dependencies
$ docker run --rm -it -v $(pwd):/application -w /application node:7 npm run production # Compile assets and minify output
Migrations and seeds for Laravel
In the same spirit as for Composer, we need very unitary containers here. I'm simply going to use the laravel-blog image to simplify my life:
$ docker run --rm -it --link mysql -v $(pwd):/application laravel-blog php artisan migrate
$ docker run --rm -it --link mysql -v $(pwd):/application laravel-blog php artisan db:seed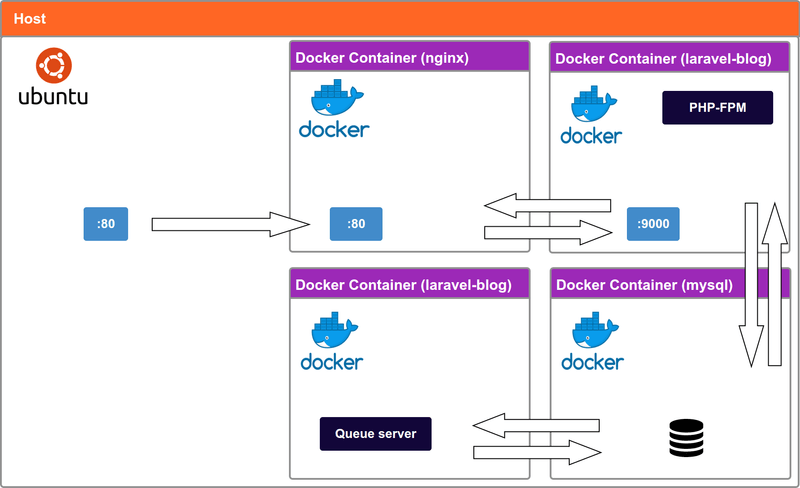
Recap of some Docker commands
$ docker ps # See running containers
$ docker ps -a # See all containers
$ docker images # See all installed images
$ docker exec -it blog-server bash # Launch bash in the blog-server container in interactive mode

# Build an image called laravel-blog via the Dockerfile in the current directory
$ docker build -t laravel-blog .

# Install dependencies via the Composer image in the current directory
$ docker run -it --rm -v $(pwd):/app composer/composer install

# Set up a MySQL container with a database saved on the host
$ docker run --name mysql -p 3306:3306 -v $(pwd)/tmp/db:/var/lib/mysql -e MYSQL_ROOT_PASSWORD=secret -e MYSQL_DATABASE=laravel-blog -d mysql

# Launch the application container for PHP-FPM
$ docker run --name blog-server -v $(pwd):/application --link mysql:mysql -d laravel-blog
# Launch Laravel's job engine
$ docker run --name queue-server -v $(pwd):/application --link mysql:mysql -d laravel-blog php artisan queue:work

# Launch Laravel migrations
$ docker run --rm -it --link mysql -v $(pwd):/application laravel-blog php artisan migrate
# Launch Laravel seeds
$ docker run --rm -it --link mysql -v $(pwd):/application laravel-blog php artisan db:seed

# Launch Nginx on port 80
$ docker run --name nginx --link blog-server -v $(pwd)/nginx.conf:/etc/nginx/conf.d/default.conf -v $(pwd):/application -p 80:80 -d nginx

# Install JavaScript dependencies via npm
$ docker run --rm -it -v $(pwd):/application -w /application node:7 npm install
# Compile project assets via an npm script
$ docker run --rm -it -v $(pwd):/application -w /application node:7 npm run production
And there you have it! If all goes well, everything is operational, and we could stop here!
However, even though all this is very good, there are some problems.
First, it's not practical to reproduce on different machines. You'd have to make a list of commands to copy-paste; it's quite annoying and impractical, even if it's not that far off in the end. Having to do it every time we want to set up our environment isn't the most fun.
We can use this setup both for a development and a production environment by paying more attention to security at the level of environment variables in the latter case. So we may have to perform this manipulation often.
And finally, I find it's super heavy to read; it's neither pleasant nor intuitive. In short, we can improve all this.
Automation with Docker Compose
Docker Compose is a tool to launch one or more containers, defined by a file named docker-compose.yml at the root of your project, with a single command line.
Here is the final file for our application:
# docker-compose.yml

version: "2"

services:
  blog-server:
    build: .
    image: laravel-blog
    links:
      - mysql
    volumes:
      - ./:/application

  queue-server:
    build: .
    image: laravel-blog
    command: php artisan queue:work
    links:
      - mysql
    volumes:
      - ./:/application

  mysql:
    image: mysql
    ports:
      - "3306:3306"
    environment:
      - MYSQL_ROOT_PASSWORD=secret
      - MYSQL_DATABASE=laravel-blog
    volumes:
      - ./tmp/db:/var/lib/mysql

  nginx:
    image: nginx
    ports:
      - "80:80"
    volumes:
      - ./nginx.conf:/etc/nginx/conf.d/default.conf
      - ./:/application
    links:
      - blog-server
The first thing that jumps out at me is the simplicity of reading. With this file, we can mount all the containers we need for our application with a single command line:
$ docker-compose up -dI'm not putting the containers that I launch individually into the file because they are intended to be launched only when needed and not every time.
After all we've just seen, I don't think detailing the file is relevant; the whole is already accessible. The name of the containers is now optional; Docker makes the link internally on its own. However, the name of the services is important for the links between containers.
In your Laravel .env file, your database configuration should look like this:
DB_CONNECTION=mysql
DB_HOST=mysql
DB_DATABASE=laravel-blog
DB_USERNAME=root
DB_PASSWORD=secret
In DB_HOST, we can put mysql because it's the name used in our --link. You'll need to adjust if you change the name of the service in your docker-compose.yml, of course. This is also valid for the Nginx configuration.
If you want to stop the containers and delete them:
$ docker-compose downThere is Docker Compose version 3, which I will talk about soon.
I think I've finished with this article; I hope I've been clear and thorough in my explanations. If you have feedback, questions, or comments, don't hesitate to leave them in the comments.
Thank you!
