Ruby On Rails: Searching with ElasticSearch, Ansible, and Vagrant
Guillaume Briday
5 minutes

Today we are going to explore several server setup concepts with a concrete example: Using ElasticSearch with Ruby On Rails. I won’t show how ElasticSearch (ES) works but how to install it on a virtual machine with Vagrant and Ansible to use it in a Rails application.
Presentation
For this project, I won’t make it complicated, a classic CRUD that will manage articles.
$ rails g scaffold Article title:string content:textWe can add the necessary gems to communicate with ES:
# Gemfile
gem 'elasticsearch-model'
gem 'elasticsearch-rails'
I also take this opportunity to add Bootstrap to quickly have a presentation that’s a bit more pleasing to the eye.
A quick:
$ bundle install
$ rails db:migrate
Rails part
Configuration
We will start by doing what’s needed on Rails before finishing with the virtual machine part.
We need to add a configuration to change the ES server address; by default, it’s 127.0.0.1:9200, but we don’t want ES to be on the same server, so we need to modify the host:
# config/initializers/elasticsearch.rb
Elasticsearch::Model.client = Elasticsearch::Client.new host: ('192.168.42.11'),
                                                        port: 9200,
                                                        log: true
From now on, requests will be made to the defined address. Of course, you can use the server you want or, in our case, choose the IP address of your choice.
Models
We will need to slightly modify our Article model. To be DRY and anticipate future models on which we will want to perform searches, we will use concerns. If you’re not comfortable with the concept of concerns, I invite you to check the documentation.
We will create a Searchable module:
# app/models/concerns/searchable.rb
module Searchable
  extend ActiveSupport::Concern
And in our Article model, we include the Searchable module:
# app/models/article.rb
class Article < ActiveRecord::Base
  include Searchable
Controllers
We now have access to the methods provided by the Elasticsearch model, like the search method:
# app/controllers/articles_controller.rb
class ArticlesController < ApplicationController
  # GET /articles
  # GET /articles.json
  def index
    @articles = Article.all
    if params[:q].present?
      @articles = Article.search params[:q]
    end
  end

  # Rest of the controller...
We could stop here for the Rails part, but we’ll add a bit of customization.
Back in the Searchable concern, we’ll override the search method in this way, for example:
# app/models/concerns/searchable.rb
  included do
    include Elasticsearch::Model
    include Elasticsearch::Model::Callbacks # automatically update the index whenever the record changes
We can redefine this method in each model or write new ones to be specific to each resource. If you’re not comfortable with the syntax of ElasticSearch, I refer you to the documentation for that.
VM part
Now that the Rails part is finished, we can prepare the virtual machine.
To recall what I said in the introduction, we will use two tools: Vagrant and Ansible. You must first install these tools on your system as well as VirtualBox.
Vagrant will allow communication with VirtualBox to easily set up a virtual machine with the configuration of our choice. At the root of your project, create a Vagrantfile; it will be called when running the vagrant up command. Don’t forget to choose the same IP address that we put in the Rails configuration just before.
# Vagrantfile
# -*- mode: ruby -*-
# vi: set ft=ruby :
Vagrant.configure(2) do |config|
  config.vm.hostname = 'demo.dev'
  config.vm.box = 'ubuntu/trusty64'
  config.vm.network 'private_network', ip: '192.168.42.11'
  # Run Ansible from the Vagrant Host
  config.vm.provision 'ansible' do |ansible|
    ansible.playbook = 'provisioning/dev/playbook.yml'
    ansible.sudo = true
  end
end
We can choose the hostname of the virtual machine, the image we will use (ubuntu/trusty64 in our case), and the IP address of our choice. It will download the image to your system and thus do it only once, which can take some time on the first launch.
Once the virtual machine is mounted and launched, it will run Ansible’s playbook.yml. Let’s look at that in more detail:
# provisioning/dev/playbook.yml
---
- hosts: all
  tasks:
    # Install and configure Elasticsearch
    - apt_key: keyserver=keyserver.ubuntu.com id=EEA14886
    - apt_repository: repo='deb http://ppa.launchpad.net/webupd8team/java/ubuntu trusty main' update_cache=yes
    - apt_key: url="https://packages.elastic.co/GPG-KEY-elasticsearch" id="D88E42B4"
    - shell: echo oracle-java8-installer shared/accepted-oracle-license-v1-1 select true | /usr/bin/debconf-set-selections
    - apt: name=oracle-java8-installer
    - apt_repository: repo="deb http://packages.elastic.co/elasticsearch/2.x/debian stable main" update_cache=yes
    - apt: name=elasticsearch state=present
    - service: name=elasticsearch state=started enabled=yes
    # Changing the default configuration
    - copy: src=elasticsearch.yml dest=/etc/elasticsearch/elasticsearch.yml
      notify: restart elasticsearch
Ansible allows us to provision our VM automatically by executing commands for us.
Don’t forget to version these files; any developer can have the same development environment as you afterward.
We can then launch Vagrant with:
$ vagrant upIf everything went correctly, you should have something that looks like this:
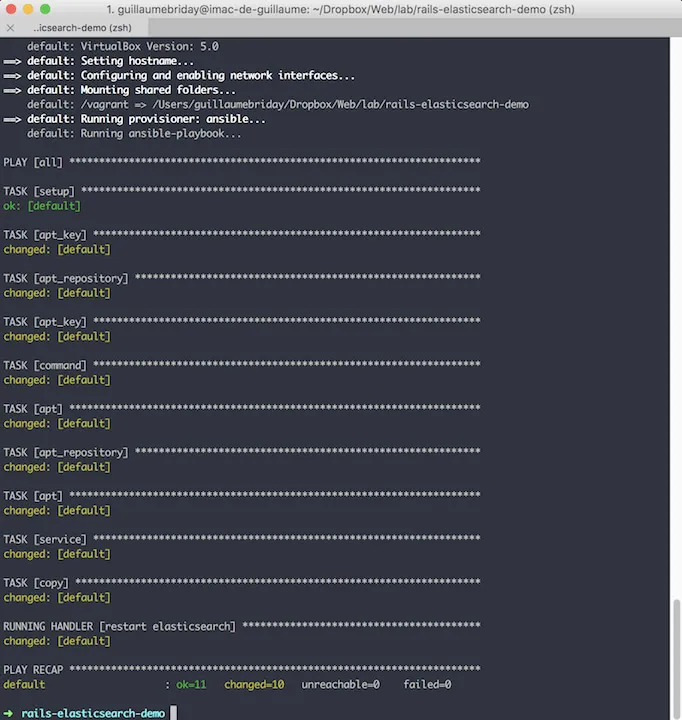
The virtual machine runs in the background; nothing opens or blocks the command prompt. You can see the status of your boxes:
$ vagrant status # current box
$ vagrant global-status # all boxes for this user
Current machine states:
You can pause your virtual machine:
$ vagrant haltOr rerun the provisioning with Ansible:
$ vagrant provisionTo see if everything is working well, we can check if ES responds correctly with curl:
$ curl -I 192.168.42.11:9200
HTTP/1.1 200 OK
Putting them together
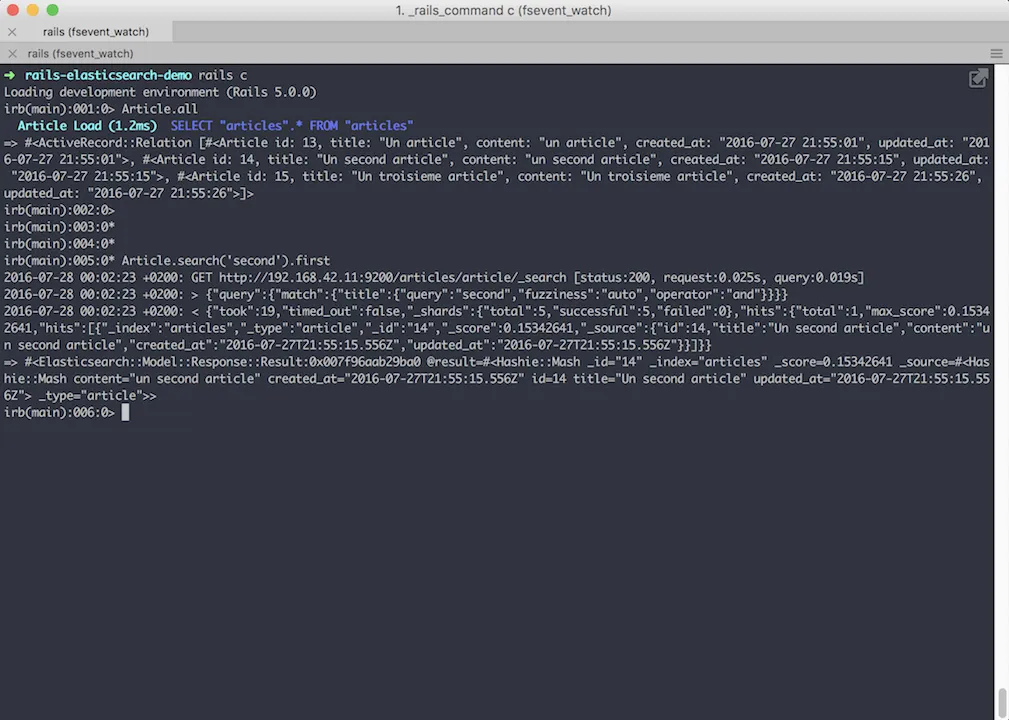
We can now run a search on Rails, can’t we?! Well… not yet. An index_not_found_exception error is raised. Indeed, ES needs to generate an index from the models, so in the Rails console:
Article.__elasticsearch__.create_index! force: true
Article.import
Article.__elasticsearch__.refresh_index!
And that for each model for which we want to use ElasticSearch…
However, be careful: ES returns an Elasticsearch object and not an Article as one might expect; it simply returns the information from its index. If you want to force loading from the database, you can use records. ES will then do a where in (:ids) and you will have Article in our case.
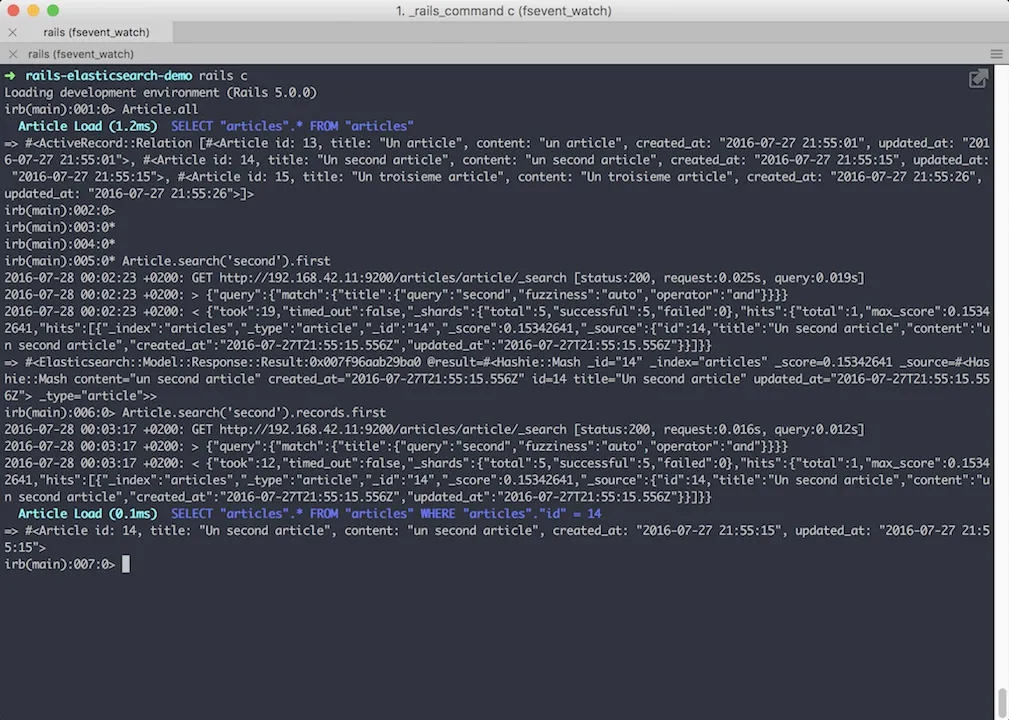
Using the records method will allow, like any ActiveRecord::Relation, chaining to modify the query:
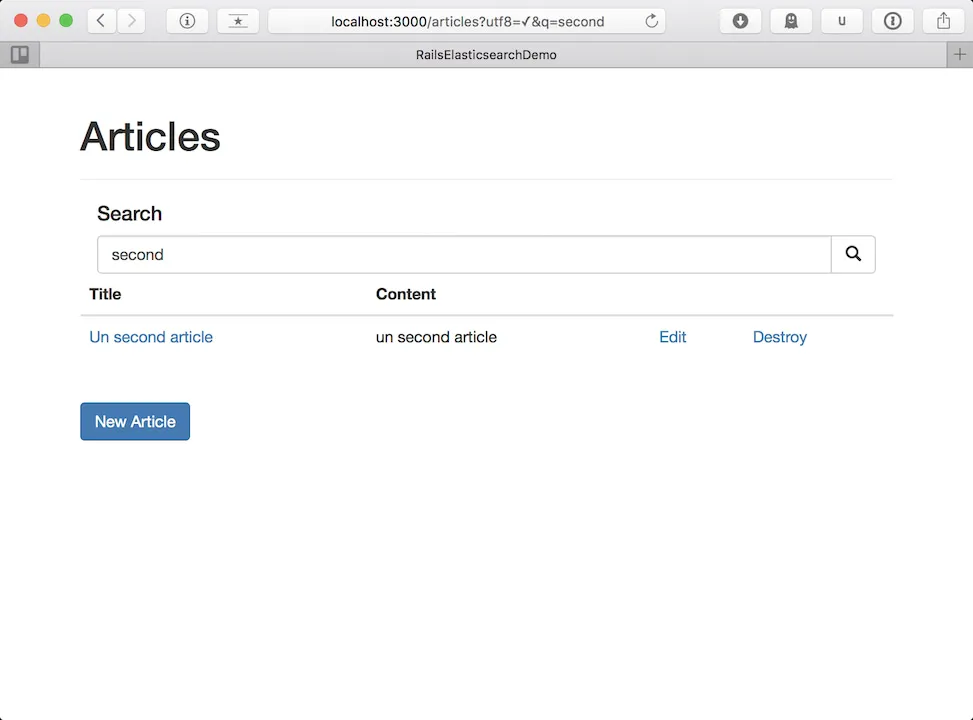
Article.search('second').records.order(title: :desc)Conclusion
Ta-da! We have a functional search! I’m publishing the entire application on this GitHub repository; feel free to correct or comment on it.

Thank you!