Laravel & Vue.js - Building a Todo list, Part 2: Authentication with JWT

Guillaume Briday
6 minutes
Before starting to develop the features of our application, we need to set up authentication. For this project, I am using JWTs.
This article is not intended to explain how JWTs work. If you want to learn more, I invite you to watch Grafikart's presentation on this topic, which helped me a lot.
As I mentioned in the introductory article, I will use a ready-made package to implement JWTs with Laravel: tymondesigns/jwt-auth.
As of the time of writing this article, version 1.0.0 is in Release Candidate, which means there will be no changes in behavior before the official release, only bug fixes. I strongly recommend using version 1.0.0 because there are many changes compared to the current version.
This package offers two interesting things. The first is that it uses the Package Discovery feature available since Laravel 5.5. This doesn't change the package's functionality but is very convenient.
The second and much more important feature is its direct implementation into Laravel's authentication system. In other words, we have almost no configuration to do to use it; everything will be managed by the package and Laravel.
Installation
$ composer require tymon/jwt-auth:dev-developI specify the dev-develop version to get the Release Candidate; you will need to remove this specification when the final version is available.
To create the configuration file, simply run the command:
$ php artisan vendor:publish --provider="Tymon\JWTAuth\Providers\LaravelServiceProvider"In this file, you can modify, among other things, the token lifetime or the algorithm used to secure your tokens.
To be able to hash the tokens, you need to generate a key, just as Laravel does for cookies with APP_KEY. Here the key is called JWT_SECRET and is generated with the command:
$ php artisan jwt:secretModel configuration
The advantage of using Laravel's authentication system is that there is almost no modification needed to the model.
You need to add two methods that the package will use in the User class and implement the JWTSubject interface.
<?php

namespace App;

use Illuminate\Foundation\Auth\User as Authenticatable;
use Illuminate\Notifications\Notifiable;
+ use Tymon\JWTAuth\Contracts\JWTSubject;

- class User extends Authenticatable
+ class User extends Authenticatable implements JWTSubject
{
    use Notifiable;

    // Rest of the class

+   /**
+    * Get the identifier that will be stored in the subject claim of the JWT.
+    *
+    * @return mixed
+    */
+   public function getJWTIdentifier()
+   {
+       return $this->getKey();
+   }

+   /**
+    * Return a key value array, containing any custom claims to be added to the JWT.
+    *
+    * @return array
+    */
+   public function getJWTCustomClaims()
+   {
+       return [];
+   }
}
And that's it. There's no migration to do since all the necessary information will be saved directly in the token.
Configuring authentication for Laravel
In the config/auth.php file, we need to make some modifications to stop using Laravel's token system and instead use JWT. Additionally, the default guard will no longer be web but api.
The guard is the type of authentication that Laravel will use. If it's web, it will use traditional PHP sessions; if it's api, by default, it will use tokens that need to be added in an api_token column in User. This is actually what I use in laravel-blog in this migration file.
To use the api guard by default with JWTs:
# config/auth.php

'defaults' => [
-   'guard' => 'web',
+   'guard' => 'api',
    'passwords' => 'users',
],

// ... Rest of the file

'guards' => [
    'web' => [
        'driver' => 'session',
        'provider' => 'users',
    ],

    'api' => [
-       'driver' => 'token',
+       'driver' => 'jwt',
        'provider' => 'users',
    ],
],
Creating an authentication Controller
Here we are talking only about authentication. Indeed, the part about creating a user remains standard and is not specific to JWT.
Before creating our controller, we will prepare our APIs to be versioned.
The concept is very simple: all our controllers will be in a specific namespace named according to the version number, for example App\Http\Controllers\V1 for version 1, and so on for all subsequent versions. The routes will also be prefixed by the version number and will call the corresponding controllers.
Once the developments are completed for the first version, we will create a new namespace for version 2 and a new prefix for the routes.
We could have a folder that looks like this:
├── Controllers
│   ├── V1
│   │   ├── Auth
│   │   │   └── AuthController.php
│   │   ├── TasksController.php
│   │   └── UsersController.php
│   ├── V2
│   │   ├── Auth
│   │   │   └── AuthController.php
│   │   ├── TasksController.php
│   │   └── UsersController.php
│   └── Controller.php
Versioning is important because it will allow us to assure clients of our API that the behavior will not change for a given URL.
In fact, if in the second version, the JSON returned for the list of tasks is no longer the same as in the first version, clients would not expect to receive this format, and applications would no longer work.
With a versioning system, we allow old clients to migrate to a more up-to-date version of the APIs when they can, and new clients to benefit from the latest features of our APIs.
The documentation provides us with a ready-to-use controller. In my case, I prefer to place it in a subfolder Auth that will host all controllers related to account management.
<?php

namespace App\Http\Controllers\V1\Auth;

use App\Http\Controllers\Controller;
use Illuminate\Http\Request;
use Illuminate\Support\Facades\Auth;

class AuthController extends Controller
{
    /**
     * Create a new AuthController instance.
     *
     * @return void
     */
    public function __construct()
    {
        $this->middleware('auth:api', ['except' => ['login']]);
    }

    /**
     * Get a JWT token via given credentials.
     *
     * @param  \Illuminate\Http\Request  $request
     *
     * @return \Illuminate\Http\JsonResponse
     */
    public function login(Request $request)
    {
        $credentials = $request->only('email', 'password');

        if ($token = $this->guard()->attempt($credentials)) {
            return $this->respondWithToken($token);
        }

        return response()->json(['error' => 'Unauthorized'], 401);
    }

    /**
     * Get the authenticated User
     *
     * @return \Illuminate\Http\JsonResponse
     */
    public function me()
    {
        return response()->json($this->guard()->user());
    }

    /**
     * Log the user out (Invalidate the token)
     *
     * @return \Illuminate\Http\JsonResponse
     */
    public function logout()
    {
        $this->guard()->logout();

        return response()->json(['message' => 'Successfully logged out']);
    }

    /**
     * Refresh a token.
     *
     * @return \Illuminate\Http\JsonResponse
     */
    public function refresh()
    {
        return $this->respondWithToken($this->guard()->refresh());
    }

    /**
     * Get the token array structure.
     *
     * @param  string $token
     *
     * @return \Illuminate\Http\JsonResponse
     */
    protected function respondWithToken($token)
    {
        return response()->json([
            'access_token' => $token,
            'token_type' => 'bearer',
            'expires_in' => $this->guard()->factory()->getTTL() * 60
        ]);
    }

    /**
     * Get the guard to be used during authentication.
     *
     * @return \Illuminate\Contracts\Auth\Guard
     */
    public function guard()
    {
        return Auth::guard();
    }
}
We notice that there is a middleware that uses Laravel's native authentication to check if a user is logged in, except, of course, for the login itself.
Routes
We will define a group that will be prefixed by v1 and that will use the V1 namespaces. I create a specific subgroup for authentication to add a prefix and especially a namespace.
Later, we can create a group for version 2.
Route::prefix('v1')->namespace('V1')->group(function () {
    Route::prefix('auth')->namespace('Auth')->group(function () {
        Route::post('login', 'AuthController@login');
        Route::post('logout', 'AuthController@logout');
        Route::post('refresh', 'AuthController@refresh');
        Route::post('me', 'AuthController@me');
    });

    # Rest of our routes for V1
});

// Route::prefix('v2')->namespace('V2')->group(function () {
    // Our routes for V2
// });
Generating and using a token
Now that everything has been configured, we will be able to generate and use our tokens.
Since we have not yet set up the user creation system, I will use tinker.
$ docker-compose run --rm todolist-server php artisan tinker
>>> App\User::create(['name' => 'anakin', 'email' => '[email protected]', 'password' => bcrypt('4nak1n')]);
=> App\User {#819
     name: "anakin",
     email: "[email protected]",
     updated_at: "2017-12-28 00:15:02",
     created_at: "2017-12-28 00:15:02",
     id: 3,
   }
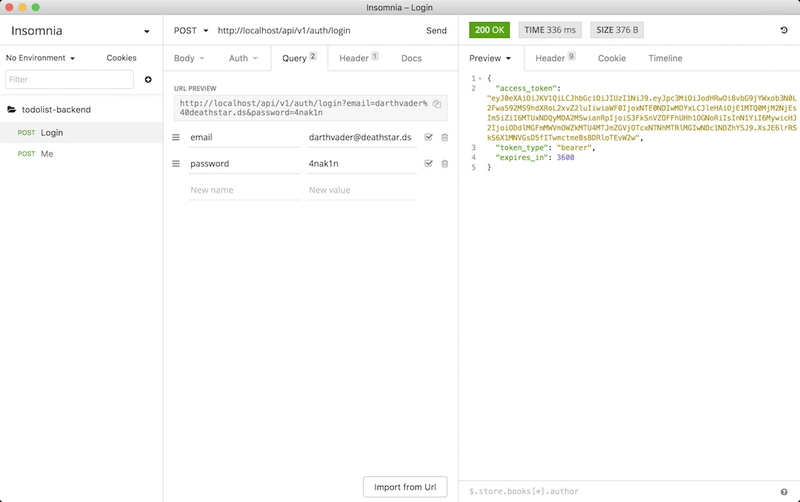
To generate a token, simply send your email and password. I will use Insomnia, which is a great open-source and free tool for making HTTP requests, but you can use Postman if you are more familiar with it.

We can try entering incorrect credentials, and we will then receive a 401: Unauthorized error.
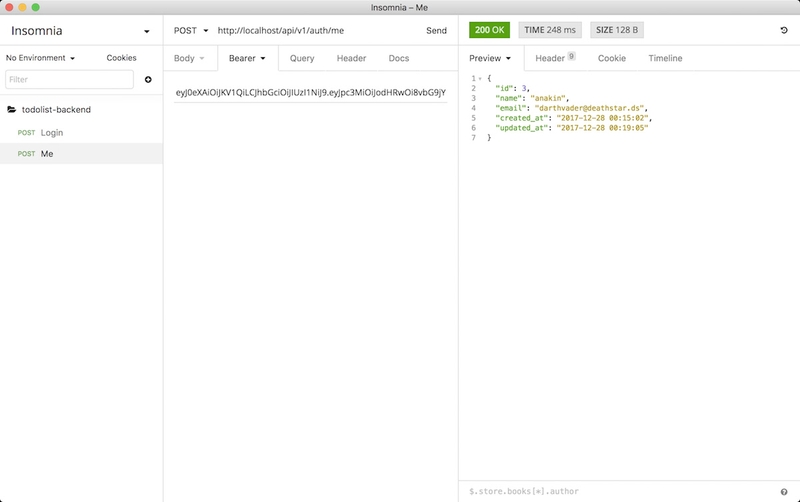
If the credentials are correct, we receive our token, which we can use to authenticate ourselves:

Similarly, if we remove the JWT from the request, we get the same error as above, so the middleware works as expected!
Note: Be sure to add the X-Requested-With header with the value XMLHttpRequest so that Laravel understands we are making an AJAX request.
Conclusion
From now on, for all the requests in our application, we will need to add the token to be authenticated until its expiration after one hour, but it can be renewed for two weeks.
If you have any questions, don't hesitate! I update the GitHub repository as soon as possible.

